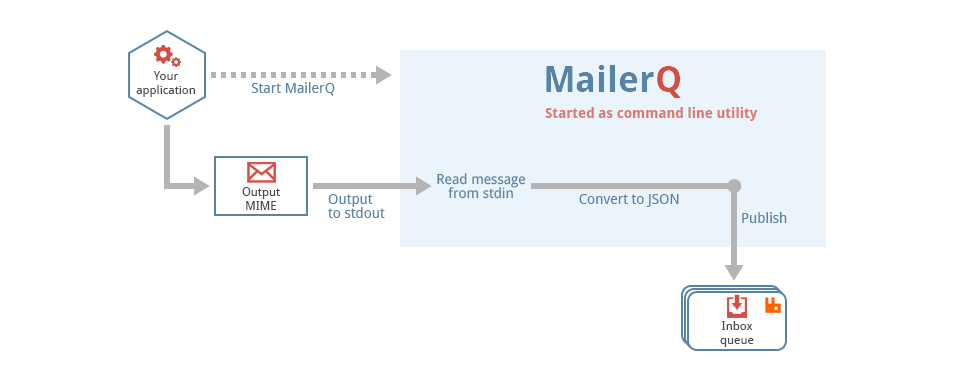
MailerQ is premium Mail Transfer Agent (MTA), developed to sent bulk emails. It is loaded with some cool features like IP rotation, external MTA IPs, multiple domains, real time stat and so on.
Requirements for MailerQ
- A domain from namecheap, Godaddy
- MailerQ license
- A Cloud or VPS with Ubuntu 20.04 ( minimum 4 GB RAM ). I am using Contabo for the demonstration.
Check out the list of VPS provider with open port 25.
Environment Setup
Connect to the Remote Server
After you have received VPS/cloud login credentials, you need to connect to remote server. Depending on which operating system you are currently working, there are different tools to connect to remote server.
| Operating System | Tool |
| Windows | Putty, BitVise |
| Linux | Terminal |
| MacOS | Terminal |
You can follow this guide to learn more about connecting to remote server.
Checking Port Accessibility
Now you are connected to remote server successfully. But before you can even proceed, you need to make sure port 25 is open on your hosting. Otherwise, whole hard work will go in vain.
To check for open port 25, first install telnet.
1 | sudo apt install telnet -y |
Then execute the following command
1 | sudo telnet smtp.gmail.com 25 |
Now, if port 25 is open, you will see connected message.
Otherwise, you will get timeout message or your command will take infinite time to display output.
Checking Blacklisting of IP
Now you know that port 25 is open on VPS. It’s time to check for VPS IP for backlisting. Blacklisted IP won’t deliver emails to inbox. Simply go to Mxtoolbox and copy your IP to run the check.
If your IP is clean, you are good to go. Otherwise, contact your hosting for replacement of blacklisted IP.
Initial DNS setup
After fulfilling above two pre-requisite, it’s time to create few DNS records for your domain. These records are as follows.
| Type | Host | Value |
| A | IP address | |
| MX | @ | mail.yourdomain.com |
Installation of MailerQ
Now, you have completed above steps, it’s time to install MailerQ. We will begin with updating and installing few packages required by MailerQ.
Updating and Upgrading VPS
First of all update your Ubuntu
1 | sudo apt update -y |
Next upgrade the Ubuntu with following command
1 | sudo apt upgrade -y |
Set the hostname
1 | sudo hostnamectl set-hostname mail.yourdomain.com |
Installing RabbitMQ
MailerQ requires RabbitMQ to process queue. First of all you need to install few dependencies.
1 | sudo apt-get install curl gnupg debian-keyring debian-archive-keyring apt-transport-https -y |
After that add signing keys and few repositories
1 2 3 | sudo apt-key adv --keyserver "hkps://keys.openpgp.org" --recv-keys "0x0A9AF2115F4687BD29803A206B73A36E6026DFCA"curl -1sLf https://dl.cloudsmith.io/public/rabbitmq/rabbitmq-erlang/gpg.E495BB49CC4BBE5B.key | sudo apt-key add -curl -1sLf https://dl.cloudsmith.io/public/rabbitmq/rabbitmq-server/gpg.9F4587F226208342.key | sudo apt-key add - |
Now add apt repositories maintained by Team RabbitMQ
1 2 3 4 5 6 | sudo tee /etc/apt/sources.list.d/rabbitmq.list <<EOFdeb-src https://dl.cloudsmith.io/public/rabbitmq/rabbitmq-erlang/deb/ubuntu focal maindeb-src https://dl.cloudsmith.io/public/rabbitmq/rabbitmq-server/deb/ubuntu focal mainEOF |
Next, update the repository and install Erlang
1 2 3 4 5 6 | apt-get update -ysudo apt-get install -y erlang-base \ erlang-asn1 erlang-crypto erlang-eldap erlang-ftp erlang-inets \ erlang-mnesia erlang-os-mon erlang-parsetools erlang-public-key \ erlang-runtime-tools erlang-snmp erlang-ssl \ erlang-syntax-tools erlang-tftp erlang-tools erlang-xmerl |
At last, install RabbitMQ.
1 | apt-get install rabbitmq-server -y --fix-missing |
Now, we have rabbitMQ installed let’s check the status
1 | systemctl status rabbitmq-server |
Installing MailerQ
First download and add the repository key
1 | wget -qO - https://packages.mailerq.com/mailerq.key | sudo apt-key add - |
Add the MQ repository to apt
1 | echo "deb https://packages.mailerq.com/debian stable main" | sudo tee /etc/apt/sources.list.d/mailerq.list |
Update and install MailerQ
1 2 | sudo apt updatesudo apt install mailerq |
Configuration of MailerQ
The config file for MailerQ is located at “/etc/mailerq/config.txt”. In this file, you have to pass on few information like address and login credentials of your RabbitMQ message broker, Management Console and the address of your database. Change your management console port to 8485 in config.
1 2 | # Management console configurationwww-port: 8485 |
After above step, you need to start MailerQ
1 | sudo service mailerq start |
Now, you can got http://YOUR_IP:8485 to access the Management Console and send your first email.
Final DNS Setup
After configuration you need to create few more records to ensure your emails go to inbox. They are as follows.
| Type | Host | Value |
| TXT | @ | v=spf1 mx ip4:XX.XX.XXX.XX ~all |
| TXT | _damrc | v=DMARC1; p=none |
| TXT | dkim._domainkey | v=DKIM1; k=rsa; p=MSNJHGHGhgVHGGFYSFTYXGHG…….. |
Now, before sending test email, don’t forget to create reverse DNS record. also known as PTR records. This can be done by yourself in Contabo, but in other hosting you may want to ask the hosting provider.
Conclusion
MailerQ installation difficulty is above average. I have written all the steps for successful installation. If you face any issue, feel free to open a topic in forum.
Comments 0
Be the first to share your thoughts!