

What is MailWizz?
MailWizz is an email marketing automation system that allows users to build their own email marketing systems. It is a self-hosted solution, which means that it consists of two parts: the sender (SMTP service) and the management application. The management application is where users can configure and manage their email lists, marketing campaigns, and analyze results, among other things. MailWizz is a one-time payment PHP script that can be purchased from here.
What do we mean by a self-hosted email marketing solution?
A self-hosted email marketing solution refers to an email marketing system that is hosted on the user's own server, rather than on a third-party server. This means that the user has complete control over their email marketing system and can customize it to their specific needs. A self-hosted email marketing solution typically consists of two parts: the sender (SMTP service) and the management application. The sender is responsible for sending emails over the internet, while the management application is where users can configure and manage their email lists, marketing campaigns, and analyze results, among other things.
What are the requirements to set up MailWizz?
To set up MailWizz, you must have the following things:
- A domain name: This is the URL that you will use to access the MailWizz system (Namecheap Recommended).
- A VPS (Virtual Private Server): This is the server where you will host, install and run the MailWizz system (Vultr Recommended).
- A MySQL database: This is where MailWizz will store all of its data, such as email lists and campaign information.
- Apache, PHP, and MySQL: These are required to host any PHP application like MailWizz on your server.
- An FTP client: This is used to upload the MailWizz installation package to your web hosting account.
- The MailWizz installation package.
Once you have these things, you can begin the process of setting up and installing MailWizz.
How to connect domain with VPS?
To connect a domain with a VPS (Virtual Private Server), you will need to point the domain to the VPS's IP address. Here's how to do it:
- First, find the IP address of your VPS. This can usually be found in the control panel or dashboard provided by your VPS hosting company.
- Next, go to the domain registrar where you purchased your domain. This could be a company like GoDaddy, Namecheap, or others.
- Sign in to your account and find the "DNS Management" or "Name Server Management" section.
- Find the option to change the name servers for your domain. You will need to enter the name servers provided by your VPS hosting company. These can usually be found in the control panel or dashboard for your VPS.
- Save your changes and wait for the DNS changes to propagate. This can take anywhere from a few hours to a couple of days.
Once the DNS changes have propagated, your domain should be connected to your VPS. You can test this by visiting the domain in a web browser and seeing if it loads the website hosted on your VPS.
How to connect VPS server using any SSH client like PuTTY?
- Download and install PuTTY on your computer.
- Open PuTTY and enter the IP address or hostname of your VPS in the "Host Name" field.
- In the "Category" menu on the left, go to "Connection > SSH > Auth".
- Click the "Browse" button and select the private key file that was provided to you by your VPS hosting company. This is usually a .ppk file.
- In the "Category" menu on the left, go to "Session".
- Enter a name for this connection in the "Saved Sessions" field and click the "Save" button.
- Click the "Open" button to open the connection to your VPS.
- When prompted, enter the username and password for your VPS. You should now be connected to your VPS via SSH.
Install Apache, PHP, and MySQL which are the prerequisites for hosting any PHP application like MailWizz
*Note: In DigitalOcean or some other providers, you can get a server with all prerequisites installed. If this is your case, you can skip this installation and go directly to the Creating a MySQL Database section.
Step 1: Install Apache2 Web Server on Ubuntu
Run the commands below to install Apache Web Server on our VPS server.
sudo apt update
sudo apt install apache2
Just wait a few seconds for the installation to finish, then run the following commands to test and enable the Apache service.
sudo systemctl restart apache2.service
sudo systemctl enable apache2.service
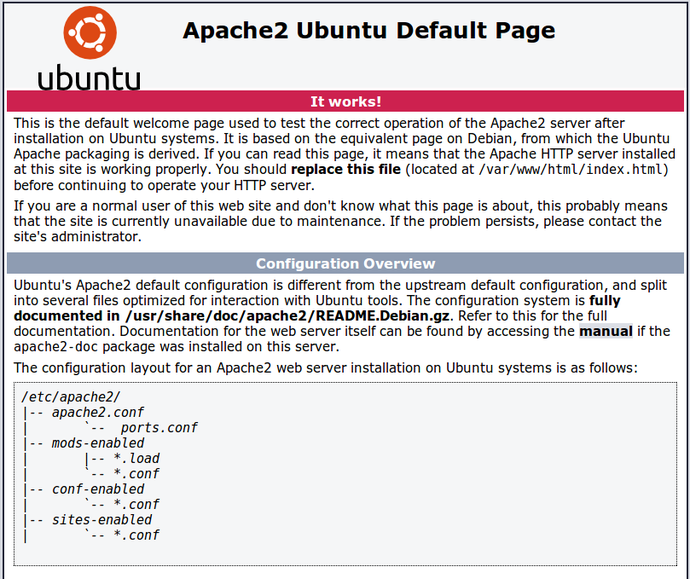
To test if Apache is working on your server, open any web browser and browse to the VPS IP address (http://YOUR_SERVER_IP).
You should see the Apache default page like this:
Step 2: Install MariaDB (MySQL) Database Server
MailWizz is like any other PHP system that requires a database to save data. So we will use the MariaDB MySQL database system for this purpose.
To install MariaDB, run the commands below:
sudo apt-get install mariadb-server mariadb-client
The commands below can be used to stop, start and enable the MariaDB MySQL service to always start up when the server boots.
Run these on Ubuntu 20.04 LTS:
sudo systemctl stop mysql.service
sudo systemctl start mysql.service
sudo systemctl enable mysql.service
Run these on Ubuntu 18.04 and 18.10 LTS:
sudo systemctl stop mariadb.service
sudo systemctl start mariadb.service
sudo systemctl enable mariadb.service
After that, run the commands below to secure the MariaDB server by creating a root password and disallowing remote root access.
sudo mysql_secure_installation
When prompted, answer the questions below by following the guide.
Enter current password for root (enter for none): Just press the Enter
Set a root password? [Y/n]: Y
New password: Enter your new password (create a secure one)
Re-enter new password: Repeat your new password
Remove anonymous users? [Y/n]: Y
Disallow root login remotely? [Y/n]: Y
Remove test database and access to it? [Y/n]: Y
Reload privilege tables now? [Y/n]: Y
Restart MariaDB MySQL service
To test if MariaDB is installed, type the commands below to log in to the MariaDB server:
sudo mysql -u root -p
Then type the password you created above to sign on. If successful, you should see the MariaDB welcome message like this:
MariaDB Installed Successfully
Step 3: Install PHP and Related Modules
Since MailWizz is a PHP-based script, we need to install PHP and some modules on our server. I will be installing PHP 7.4 in this guide, but feel free to use any version you want — just change "7.4" to "7.X" in the commands.
sudo apt install php7.4 libapache2-mod-php7.4 php7.4-common php7.4-gmp php7.4-curl php7.4-intl php7.4-mbstring php7.4-xmlrpc php7.4-mysql php7.4-bcmath php7.4-gd php7.4-xml php7.4-cli php7.4-zip php7.4-imap
After installing PHP 7.4, open WinSCP to edit the php.ini file.
WinSCP is a free, open-source file transfer program that allows users to transfer files between a local and a remote computer. It supports a variety of file transfer protocols, including FTP, SFTP, and SCP.
Open WinSCP and connect to your server using your server IP/name and root credentials. Then navigate to this directory: "/etc/php/7.X/apache2/" where you can find the "php.ini" configuration file.
Right-click on "php.ini" and click Edit.
Then make the changes on the following lines in the file and save:
file_uploads = On
allow_url_fopen = On
short_open_tag = On
memory_limit = 256M
max_execution_time = 360
date.timezone = Asia/Kolkata
After applying the changes above, save the file and close it. Then go to PuTTY again and restart the Apache service:
sudo systemctl restart apache2.service
Step 4: Create MailWizz Database
Now that we are done installing all the prerequisites and our server is ready for the installation, we need to create a database for MailWizz in MariaDB.
To log in to the MariaDB MySQL database server, run the commands below.
sudo mysql -u root -p
Then create a database called MailWizz:
CREATE DATABASE mailwizz;
Create a database user called MailWizz with a new password:
CREATE USER 'mailwizz'@'localhost' IDENTIFIED BY 'Enter_Your_Password';
Then grant the user full access to the database.
GRANT ALL ON mailwizz.* TO 'mailwizz'@'localhost' IDENTIFIED BY 'Your_Password_Here' WITH GRANT OPTION;
Finally, save your changes and exit.
FLUSH PRIVILEGES;
EXIT;
Step 5: Set Up MailWizz
Now we are ready. You just need to upload the MailWizz "latest" folder to the server and run the installation. Follow these simple steps:
1. Zip the MailWizz "latest" folder that you will find when you download MailWizz.
2. Upload "latest.zip" to our server in /var/www/html using WinSCP.
3. Connect to your server using the PuTTY SSH client.
4. Change directory to /var/www/html using the following command:
Explore a Premium Online Opportunity
Discover selected digital offers and online tools that may help you grow your projects, business, and productivity.
cd /var/www/html
5. Install the unzip tool using the following command (this will be used to unzip the "latest" folder):
sudo apt-get install unzip
6. Clear the PuTTY screen to make it clean using the following command:
clear
7. Unzip the "latest.zip" file using the following command:
unzip latest.zip
8. Using WinSCP, move the "latest" folder contents to the upper directory so they can be accessed directly (just drag and drop using WinSCP).
Then delete the html folder, and rename "latest" to "html".
In this way, the MailWizz files are in the html folder directly.
9. Start the MailWizz installation by opening your web browser and navigating to: yourdomain.com/install
Configure MailWizz
Now, enter your purchase code, agree to the terms, and click Next.
Install PHP extensions required by MailWizz
If you see any PHP extensions labeled in red or yellow (check the image below), then you need to install them before you continue:
Simply run the following commands:
sudo apt install php7.4-xml
sudo apt install php7.4-mbstring
sudo apt install php7.4-curl
sudo apt install php7.4-zip
sudo apt install php7.4-imap
Note: Don't forget to replace 7.4 with your active PHP version.
Then restart the Apache service using the following command:
sudo service apache2 restart
Now click Next, and the MailWizz installation will check for folder permissions. If you see any warnings, open WinSCP and set the permissions for each folder listed to 777.
You can also use PuTTY to set permissions with the chmod command:
sudo chmod -R 777 /directory_path
After you set all permissions, refresh the page and check if everything is OK, then click Next.
On the next page, enter your database info. In our case:
Hostname: localhost
Port: 3306
Username: mailwizz
Password: Enter Your DB Password
Database name: mailwizz
Click Next and create your admin account.
Set Up Cron Jobs
Congratulations! Now we have finished the installation process and MailWizz is up and running. We only need to set up the cron jobs.
What are Cron Jobs?
Cron jobs are tasks that are scheduled to run automatically at a specific time or interval. They are often used to automate system maintenance or administration, such as backing up databases, sending emails, or updating software.
In the context of a web server, cron jobs are typically set up using a command-line utility called "cron". The administrator can specify when and how often the cron job should run by creating a crontab file that specifies the schedule and command to be executed.
For example, to run a backup script every day at midnight, the administrator could create a crontab entry that looks like this:
0 0 * * * /path/to/backup.sh
This would run the backup.sh script every day at midnight (12:00 AM). The syntax for specifying the schedule follows a specific format, with the five fields representing:
Minute (0-59)
Hour (0-23)
Day of the month (1-31)
Month (1-12)
Day of the week (0-6, with 0 being Sunday)
Followed by the command to execute.
Cron jobs can be very useful for automating tasks and freeing up time for other activities, but they can also cause problems if not configured properly. It is important to test and verify that cron jobs are running correctly before relying on them for critical tasks.
Where to paste cron jobs?
Open WinSCP, and in the "/etc" directory you will find the "crontab" file. Edit it and paste the jobs inside, then save.
Important Note: When you paste the jobs, add "root" to the commands so the jobs can run as the root user on your VPS. Example:
* * * * root /usr/bin/php -q /var/www/html/apps/console/console.php send-campaigns >/dev/null 2>&1
Do this for all jobs in the same way and save the file.
Install SSL Certificate
SSL certificates are an important part of maintaining the security and privacy of online communication. It is important to use SSL certificates on any website that handles sensitive information. Let's Encrypt is a free, open-source certificate authority (CA) that provides SSL/TLS (Secure Sockets Layer/Transport Layer Security) certificates to enable secure connections between a client and a server over the internet.
Connect to your server using the PuTTY SSH client.
Step 1 — Install the Let's Encrypt Client
Let's Encrypt certificates are fetched via client software running on your server. The official client is called Certbot.
First, add the repository to install Certbot:
sudo add-apt-repository ppa:certbot/certbot
And press ENTER to accept.
Then, update the package list to pick up the new repository's package information:
sudo apt-get update
Install Certbot's Apache package:
sudo apt install python-certbot-apache
Certbot is now ready to be used.
Step 2 — Set Up the SSL Certificate
The client will automatically obtain and install a new SSL certificate that is valid for the domains provided as parameters.
You simply need to run the following command (change the domain):
sudo certbot --apache -d yourdomain.com
You will be asked to provide an email address for lost key recovery and notices, and you will be able to choose between enabling both HTTP and HTTPS access or forcing all requests to redirect to HTTPS. It is usually safest to require HTTPS, unless you have a specific need for unencrypted HTTP traffic.

Questions & Comments
Ask something about this post or request help from the community.
No comments yet. Be the first to ask a question.